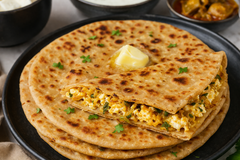
If there's one dish that instantly brings comfort to the table, it's a freshly cooked paratha roti: warm, slightly crisp on the outside, and soft enough to melt in every bite. It is the type of food that does not require much effort and ends up as a main item in any meal.
From kneading the dough to creating those flaky layers on the pan, every part of the process adds to its texture and taste. If you've ever wanted to make restaurant-style parathas in your own kitchen, this guide will show you exactly how to do it.
What Is Paratha Roti & Why Does It Matter In Indian Meals
In many Indian homes, paratha roti isn't just another flatbread; it's part of everyday life. Parathas become more delicious, with layers and sometimes fillings like potatoes, paneer or veggies tucked inside.
You can have it for breakfast, lunchboxes or even during special meals. Indian parathas are filling, flexible, and always satisfying. Whether it's a classic aloo paratha from North India or a simple tawa version, they fit into almost any mood or occasion.
Ingredients & Dough Preparation
Preparation of paratha roti begins with a plain dough, but the trick is in the technique you use.
Basic Ingredients:
- Whole wheat flour (atta)
- Water
- Salt
- Oil or ghee
Dough Preparation:
Begin with a bowl of flour and a pinch of salt. Add water gradually and knead into a soft and smooth dough. The texture should be pliable enough.
After kneading, put some oil or ghee and again knead for a few seconds. This helps in making the parathas softer. Cover the dough and let it rest for at least 20–30 minutes.
This resting time is often overlooked, but it's what gives Indian paratha its softness and elasticity, making rolling much easier.
Step-by-Step Method For Flaky Layers
Creating those beautiful layers in paratha roti is easier than it looks.
The following is how to do it:
- Divide the dough into equal balls.
- Roll one ball into a small circle.
- Apply a thin layer of ghee or oil.
- Fold it (like a fan or into a triangle/square).
- Roll it again gently into a slightly thicker disc.
Now comes the cooking part:
- Heat a tawa or flat pan on medium heat.
- Place the rolled paratha on it.
- Flip it when bubbles appear.
- Apply ghee or oil and cook both sides until golden brown spots appear.
The folding and layering process is what gives Indian paratha that flaky texture. Don't rush it; this is where the magic happens.
Types Of Indian Paratha You Can Try
One of the best things about paratha roti is its variety. You can keep it simple or experiment endlessly.
- Plain Paratha – Basic layered version with no filling.
- Stuffed Paratha – Filled with aloo, paneer or even keema.
- Lachha Paratha – Known for its visible flaky layers.
- Tawa Paratha – Quick and everyday version made on a flat pan.
Each type has its own charm. Stuffed parathas are heavier and often eaten as a full meal, while plain ones are perfect as a side with curries.
Tips For Soft & Perfect Parathas
Getting that perfect softness isn't complicated, but a few small details make a big difference.
- Always let the dough rest before rolling
- Keep the dough soft, not stiff
- Use medium heat, too hot burns and too low dries it out
- Don't skip the oil or ghee while cooking
- Press gently while cooking to help even puffing
These small tweaks can take your Indian paratha from average to truly satisfying.
Serving Ideas
Paratha roti goes well with:
- Spicy curries like chicken or paneer make every bite rich and flavourful.
- Fresh curd or raita for a cooling and light balance.
- Tangy pickles that add a sharp and bold kick.
- Green chutney or a little butter for that classic and comforting finish.
Conclusion
Making paratha roti at home is less about perfection and more about practice. The first few might not come out perfectly. But once you get a feel for the dough and the layering, it becomes second nature.
Whether you're cooking just for yourself or sitting down with family, a stack of fresh parathas always has that warm and homely feeling to it.